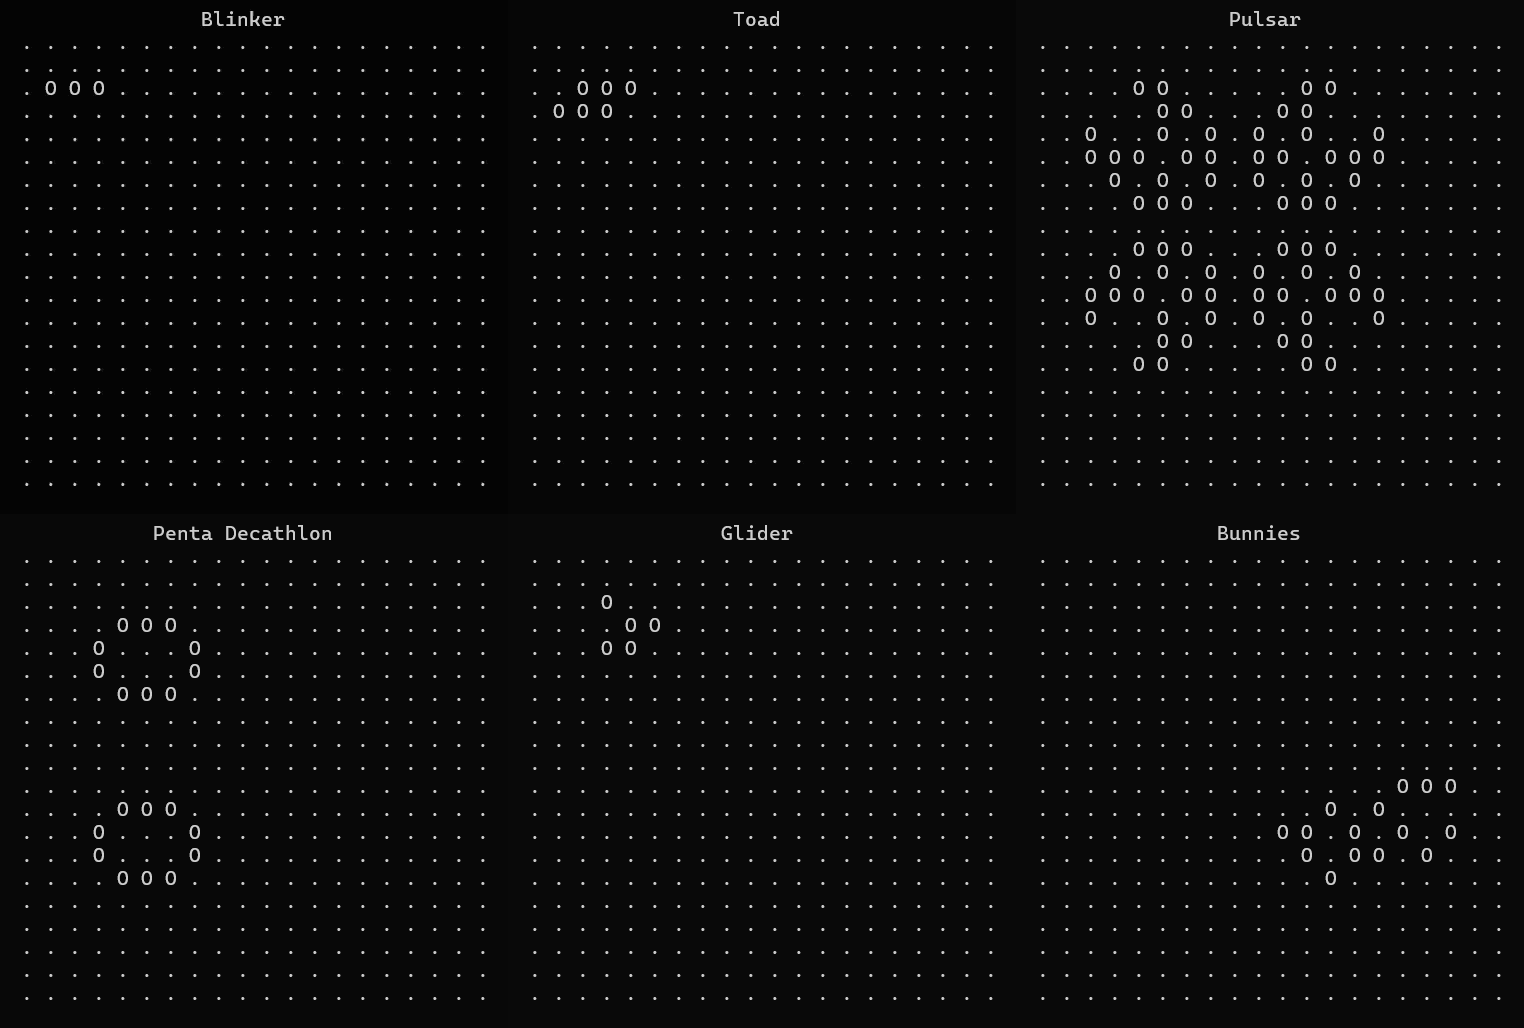
Conway’s Game of Life in the terminal, built with Python and curses. Pick a pattern, choose how many generations to run and how fast, and watch it evolve.
📜 The Rules
Every cell is either alive or dead. In each generation, all cells change at the same time based on their eight neighbors:
- A live cell with 2 or 3 live neighbors survives
- A dead cell with exactly 3 live neighbors becomes alive
- Every other cell is dead in the next generation
That is all. Out of these three rules come oscillators like the Blinker and Pulsar, gliders that travel across the grid, and even a Glider Gun that keeps producing new gliders.
💻 Technologies Used
- Python 3.10+ → Core logic, dataclasses, sets
- curses → Drawing the grid in the terminal (
windows-cursesis installed automatically on Windows) - argparse → Command-line options
- TOML → Patterns stored as plain data
🧩 How the Code Works
The project is split into a few small files, each with one job. I’ll go through them in the order the data flows: patterns → simulation → display → command line.
The core idea: only remember the living cells
The obvious way to build the Game of Life is a big 2D grid, for example a list of lists filled with 0 and 1. This project does it differently: it only stores the coordinates of the cells that are alive.
{(1, 2), (2, 2), (3, 2)}Two Python basics are used here:
- A tuple like
(1, 2)is a fixed pair of values. Here it is(row, col), so(1, 2)means “row 1, column 2”. - A set (the curly braces
{...}) is a collection without duplicates. Asking “is this cell in the set?” is very fast, and sets can be combined with simple operators, which we will need later.
If a coordinate is in the set, the cell is alive. If it isn’t, it is dead. That’s the whole board. As a bonus, there is no edge: the grid is never “full”, so a glider can fly as far as it wants.
patterns.py → Patterns as data
Starting patterns are not hardcoded. They live in a patterns.toml file, where each pattern is a name with a list of [row, col] pairs. In Python, a pattern is a small class that just holds this data:
@dataclass
class Pattern:
    name: str
    alive_cells: set[tuple[int, int]]
@dataclass is a shortcut for classes that only store values. Python writes the boring __init__ for me, so Pattern("Blinker", {(1, 2), (2, 2), (3, 2)}) just works.
To turn the TOML data into a Pattern, the file is read and every pair is converted:
alive_cells={tuple(cell) for cell in toml_data["alive_cells"]}This line looks dense, but it is a loop in one line (a set comprehension). It means: “for every cell in the list, turn it into a tuple, and collect all of them in a set”. TOML gives me lists like [1, 2], and a set can only hold tuples like (1, 2), so the conversion is needed. Written out as a normal loop it would be:
alive_cells = set()
for cell in toml_data["alive_cells"]:
    alive_cells.add(tuple(cell))
grid.py → The simulation
LifeGrid.evolve() calculates the next generation. It works in three steps. I’ll explain each one and then follow a Blinker through it.
Step 1: Count the neighbors
num_neighbors = collections.defaultdict(int)

for row, col in self.pattern.alive_cells:
    for drow, dcol in neighbors:
        num_neighbors[(row + drow, col + dcol)] += 1
neighbors is a list of the eight directions, like (-1, -1) for “one up, one left”. The loop goes through every living cell and, for each of its eight neighbors, adds 1 to that neighbor’s counter.
A defaultdict(int) is a normal dictionary with one convenience: if a key doesn’t exist yet, it starts at 0. Without it, I would have to check “is this cell already in the dictionary?” before every += 1.
After this step, num_neighbors says for every cell next to a living cell how many living neighbors it has. Cells far away from everything are never even looked at, which keeps the simulation fast.
Step 2: Apply the rules
stay_alive = {
    cell for cell, num in num_neighbors.items() if num in {2, 3}
} & self.pattern.alive_cells

come_alive = {
    cell for cell, num in num_neighbors.items() if num == 3
} - self.pattern.alive_cells
Both blocks use the same one-line loop as before, this time with an if. Read the first one like this:
{cell for cell, num in ... if num in {2, 3}}→ all cells that have 2 or 3 living neighbors& self.pattern.alive_cells→ keep only those that are already alive.&between two sets gives the cells that are in both.
That is exactly the survival rule. The second block works the same way:
{cell ... if num == 3}→ all cells with exactly 3 living neighbors- self.pattern.alive_cells→ remove the ones that are already alive.-between two sets gives the cells that are in the first but not in the second.
What’s left are dead cells with exactly 3 neighbors, which is the birth rule.
If the compact version is hard to read, here is the same logic written with normal loops:
stay_alive = set()
for cell, num in num_neighbors.items():
    if num in {2, 3} and cell in self.pattern.alive_cells:
        stay_alive.add(cell)

come_alive = set()
for cell, num in num_neighbors.items():
    if num == 3 and cell not in self.pattern.alive_cells:
        come_alive.add(cell)
Both versions do exactly the same thing. The compact one just uses & and - instead of the extra in / not in check inside the loop.
Step 3: Combine
self.pattern.alive_cells = stay_alive | come_alive| joins two sets together. The survivors plus the newborns are the next generation. Every cell that is in neither set is dead, and it doesn’t need any code, because it simply isn’t in the set anymore.
Drawing the grid
Rendering is a separate method, as_string(bbox). It loops over a rectangular window of the universe and writes O for each living cell and . for each dead one:
ALIVE if (row, col) in self.pattern.alive_cells else DEADThe window is only for display. Cells outside of it are still simulated, they just aren’t shown.
views.py → Showing it in the terminal
curses is Python’s library for drawing in the terminal. curses.wrapper prepares the terminal and always restores it afterwards, even if something crashes. Inside, the animation is a simple loop:
for _ in range(self.gen):
    current_grid.evolve()
    screen.addstr(0, 0, current_grid.as_string(self.bbox))
    screen.refresh()
    sleep(1 / self.frame_rate)
For every generation: calculate the next step, write the text at the top-left of the screen, show it, and wait. At 7 frames per second the wait is 1 / 7 seconds. If the terminal is too small to fit the grid, curses raises an error, which I catch and turn into a readable message.
cli.py and __main__.py → Starting the program
cli.py uses argparse to define the options like -p (pattern), -g (generations) and -f (frames per second). The list of allowed pattern names is read from the TOML file, so a new pattern shows up as an option automatically.
__main__.py is where everything comes together. One line is worth explaining:
View = getattr(views, args.view)getattr(views, "CursesView") looks up the class named CursesView inside the views module, using a string. It’s the same as writing views.CursesView, but the name comes from the command line. This way, a new kind of display only needs to be added to views.py and it can be chosen with --view.
The result is then started with:
View(pattern=pattern, gen=args.gen, frame_rate=args.fps).show()🚀 Getting Started
Python 3.10 or newer is required.
# Clone the repository
git clone https://github.com/heim-lukas/game-of-life.git

# Navigate into the project
cd game-of-life

# Create and activate a virtual environment (Windows)
python -m venv venv
venv\Scripts\activate

# Install the package
pip install -e .

# Run it
python -m game_of_life -p Pulsar -g 30 -f 10
On Linux and macOS, activate the environment with source venv/bin/activate.
| Option | Description | Default |
|---|---|---|
-p, --pattern | Blinker, Toad, Beacon, Pulsar, Penta Decathlon, Glider, Glider Gun, Bunnies | Blinker |
-a, --all | Show all patterns one after another | off |
-g, --gen | Number of generations | 10 |
-f, --fps | Frames per second | 7 |
The terminal needs to be at least about 40 characters wide and 21 lines tall.
Credits
This project is based on the “Conway’s Game of Life in Python” tutorial by Real Python.
You can view the full tutorial here: Real Python - Conway’s Game of Life in Python.